Search This Blog

Saturday, November 21, 2009

Crochet Box

Most of my crafting has been papercrafting lately. But I have recently started to crochet again. I'm in a Chanukah swap over at Scrapbook.com and having a blast with it! We are to make 8 items for our buddy - so what does this have to do with crochet? Well I decided I was going to present my gifts to Holly (my buddy) in non traditional ways - no store bought wrapping paper
That wasn't a swap requirement but I thought it would be fun! So I made this little crochet "box". It turns out I'm not going to be using it for Hollly as its not a size that I'll need. Isn't it cute? It was really easy to make. I just crocheted 5 squares of about the same size - actually they are rectangles. Slip stitch the 4 sides to the bottom to make like a "t" and then stitch the sides together. I may make a lettersize one to leave on the desk in our kitchen for the incoming mail I haven't dealt with yet.
Don't forget to stop by Craft It Wednesday! Participating in that blog has really helped me with consistancy and the stuff there is so fun to see!

Wednesday, November 11, 2009

Finally a LO!


I'm finally ready to post another LO - I've been doing an amazing amount of paper crafting lately but it seems like I haven't made any SB pages in forever. This picture is really lousy but I'm off to drive carpool in a bit and I wanted to post. Those of you who know me IRL know I'm a messy creative worker and the proof of a messy desk is in this picture - that I failed to cover up with the pink c/s LOL

I got some of this paper at HSN a year or so ago - I think its by 3 Birds? Made the LO really fast an easy - and I love it - I love houndstooth and shimmer - so win win! I made an embellishment from a butterfly in the SU! set Natures Beauty using my new "must have" versamark and embossing powder - black this time. The printed type paper is MM and the c/s is Pink Piroquette by SU! (I miss this color!)

Somewhere sometime I collected a package of transparency sayings and this one just "spoke to me"

Do Not Dwell in the past
do not dream of the future
Concentrate Your Mind
on the present moment - Buddah


Till next time! Thanks for visiting!!

Tuesday, November 10, 2009

Bella Blu Cards

I'm loving SU!s Bella Blu patterned paper. I've had so much fun making cards with it....Here are a few.


I think this may be one of my favorite cards! But lately I keep saying that! This card was so much fun - I just kept playing.
I took some lace and sponged it with SU! almost navy classic ink - I used scor-tape to attach it to a piece of almost navy c/s that I trimmed with my new border punch (too lazy to go downstairs and get the name, upper crest maybe?) And then I added some pearl "ribbon" also from Hobby Lobby to cover up the adhesive line. You can't see in the photo but the lace and c/s has a bit of glimmer to it cuz I sprayed it with Frost Glimmer mist. The almost navy c/s mat on the card front is also glimmered. The stamp set is SU! Friends 24-7 which has become one of my most frequently used sets


Here is a close up of the lace border.


Lately - I've been trying to make stuff with the "leftovers" when I work on a project. I end up having so many coordinating stuff laying around why not? Here is one I did with the leftovers from the one above.
I used sahara sand cardstock that I had embossed with a cuttlebug folder. You can't really see in the photo the ivory layer in the border is satin ribbon - I've become a ribbon fanatic!! I decided to try another paper rose (made from apples LOL) and used some Recollections/Michaels bling for the center.
Here is a close up of the rose. I think I like the one on the birthday card better.
Thats all for today!! Thanks for stopping by! Till next time!

Friday, October 30, 2009

Happy Birthday with a Rose


Do you ever make a project that has an aspect that you just love?

I've wanted to make nice 3D paper flower embellishements for a long time. As a kid I used to make beaded flowers - I guess I've always liked to craft flowers.

I like Prima's but they can get pricey and I end up not having the color I want for whatever I'm working on. So today I made this rose. Its my dear friend Eleanor's birthday this week and here is the card I made her. I'm not seeing her till tomorrow but I assume its "safe" to show here now.


Here's a close up of the Rose - isn't it awesome ?- I know I'm so humble LOL. Wanna know how I made it?

I took a bunch of apple shaped punchies. I put them on a mouse pad and smooshed around with a big embossing tool (I used the Chatterbox Empressor from ages ago) till each apple was kinda cupped - I cut off the stems. Then I made a small circle and put glue dots on it and then I staggered the apples around the circle and kept adding new layers . The center is an inverted apple held on by more glue dots. I kept messing with the "petals" till I liked the shape.

Up to now - these were all white - then I had fun with my glimmer mist - I just kept spraying a bunch of different colors. After it dried - I took some chalk on a pom pom and added a bit of color to the spots that were still white.

The leaves were punched and I used tweezers to run them through the left over glimmer mist on my nonstick mat. Attached with...glue dots of course LOL

Inside is a treat! I think I'm gonna have to jazz up the inside before I see her tomorrow ! Hope you liked this - thanks for stopping by! Till next time!


Tuesday, October 20, 2009

Halloween Goodness


I made some cute paper backpacks for my DD to give to her friends for Halloween. I've seen these made on a couple of blogs but here is where I saw them first and is a great webstite for directions and inspiration in general!. http://inkingidaho.blogspot.com/2008/09/start-with-piece-of-cardstock-measuring.html. DD is 19 and typically has no desire/patience for Mom's paper projects - but this one sparked her interest when she saw one I'd made and I'm making 12 for her to give to her college friends...

P.S. If any of you blog readers can help this computer illiterate person - what do I need to do to get the link to inkingidaho to post as a link vs the url?

Ok back to the project - Here are a few of the backpacks made - aren't they cute?


Here is the back with the cute ribbon "backpack" handles!


I've never made stuff in bulk before and decided to make an assembly line - this is the only photo that came out clearly but I think you can see the process.


I used velco dots to close the flap and plan on putting mini candy bars inside the big pocket.

Hope you enjoyed these! Thanks for looking - and if you don't mind - drop a quick comment so I know if anyone's been here LOL cuz I don't know how else to know LOL!!

This has been a difficult post to make - lots of picture loading issues - but I'm so glad it worked - off to watch NCIS with my youngest - our fav show!!!

Andrea

Friday, October 2, 2009

Use it or lose it!!

Ok I've been a bad blogger!! A month since my last project posting...you know you've been away too long when you have trouble remembering your password. Well - here's to hoping I'm back sooner next time - I'll try!

Why this title? My Mom (may she rest in peace) used to say I deserved to use my "good" stuff for me - she also used to talk about "Use it or Lose" specifically in reference to aging and using one's brain to stay sharp. Sunday would have been her 80th birthday so she's been on my mind extra lately - but hey - you guys aren't here for this!! Except to say - my new approach is gonna be use that nice stuff for me - use it NOW!! Don't save it all for "best" - I'm refering to lots in my life but for the purposes of this blog - for my crafting stuff. I recently moved to a larger space and have my own SB room - and thus have access to stuff I've stashed for years - and guess what - lots of it isn't any good - a couple of ink pads had disintegrated - some rub-ons didn't work too well (but that could have been the brand) and the paper - well lets just say - I'm pickyer now LOL.

So here is (finally) a card I made for Halloween. I am sending it to my sister - but I think I'm safe to post it cuz I don't think she visits here (oops if I'm wrong).

Its a trifold Gate card that I saw at SCS and had to try.

Here is the card closed.

I used Martha Steward stamps I got on clearance at Michael's last year with versamark and SU! black embossing powder. From my stash - ribbon and rubons and the pumkins eyes are triangular bling!


When you open up the card it has several different panels to decorate. I'm going to sign my name and write a note to my sister on some orange cardstock and attach it to the open dotted patterned paper - also from my stash.


This one isn't the best photo but I wanted to show y'all the neat way the card opens.
Thanks for visiting (and letting me ramble LOL). Till next time. Andrea

Saturday, September 5, 2009

My Favorite Card

To date this is my Favorite Card. I sent it to my dear friend and SU! demo who moved away - HI Sharon if you finally made it here!


I used the SU! set friends 24-7, bashful blue and chocolate chip cardstock, ink and ribbon. The top note die, a cuttlebug embossing folder and SU! clear embossing powder.
I embossed with clear embossing powder the brocades from the set to make my own patterned paper. I cut a top note from cardstock and then ran it through a cuttlebug embossing folder. I stamped the bird image twice in chocolate chip ink on scrap white c/s. I colored w/ SU! markers. The secondof the birds I cut out and adhered with popdots. I put glitter on his belly and layered the thinner brown ribbon ontop of the 1 inch thick blue ribbon. After attaching the ribbon I matted my glittered birdie and adhered to my top note. I then stamped brocades on the envelop flap - I love decorated envies! and the Friends sentiment on the lower left.


My new thing now is pretty insides . I needed to mail Sharon a check for my order so I folded the check in half and used the ribbon border like a pocket. The right side is pretty obvious - bashful blue c/s and a quick sentiment stamp.
Sorry if my descriptions are rambling and perhaps boring to some of y'all. I like when I go to blogs and the folks tell me what they used and/or how so I can take a little bit away for me to try. Do you guys like that or not?
Thats all for today! Thanks for stopping by.

Tuesday, September 1, 2009

Sponged Card


I decided to try something different today and tried to make a brayered card. Well that so did NOT work. I couldn't get rid of the lines the brayer left. If any of you guys have any brayer tips - HELP!! I suppose in the next few days I'll be stalking YouTube for tips.
So I tried the next best thing. I used SU! sponges and sponged white cardstock with all SU! colors - yoyo yellow, only orange, real red, close to cocoa, and chocolate chip. The trees and birds are from Definately Decorative Pines - a retired SU! set and I inked it with sage green and then took all the different green markers and thumped and generally just dabbed ontop of the inked stamp to give shading of the trees. The ground is a beach/sand stamp from my stash. I used the nesties to cut my label and the sentiment is from SU! Simple Delights.
I like how this looks IRL. Next I want to try a beachy type scene. I'm gonna have to think about the shades of blue to use...ok thats all for now - dinner calls!! Thanks for stopping by!!
P.S. So ok - I really need to find a better way to take photos cuz this looks so much prettier and richer in real life...I'll add it to the list of what I wanna learn - but I may retake this tomorrow when the sun is out - I bet that will help

Sunday, August 30, 2009

DVD Project

DVD Holder

This is about my journey to create a DVD holder for my DD to take movies to college. She has a huge movie collection and the DVD cases took up too much space. She asked me to make something right before moving day. Now I've never created from "scratch" any kind of box or bag etc. I've done lots by following tutorials. Here is the first creation I made - simple and not too decorated as time was short and DD has simple and clean taste.
I of course used my Bind It All to hold it all together. This has to be one of the best tools I've ever purchased. As you cann see here on my blog - I sure do use it alot!
I started off with the paper cd holders. They were not big enough to hold a DVD and be bound with the BIA so I folded the little flap back and decided my holder would have to make sure to have a closed side so nothing fell out.


I used SU! real red and black cardstock. The patterned paper is from my stash (yeah!! I used some!!)

Looks great right?? Well there was a problem. I told you this was my first "design" of anything like this and I forgot to account for the extra space the DVDs would take in the envelops so the project looked nice in the photo above here while empty but it was so big when full that not only did it not close but the BIA rings weren't big enough to hold it. BIA has come out with a bigger coil but I don't have any nor do I have access to a LSS any more :{ and Hobby Lobby doesn't carry the big coils yet.
So time to be CREATIVE!
Here you can kind of see what I'm talking about - see how "fat it is"? Well I split it in two and decided to use 1 coil in the center to hold two mini holders on each side.
I then used the same cover I had already made for the holder before I realized how much room the DVDs take. I made another one just like it and attached it to the other side. I used velcro to hold the flaps closed.

The finished product! I took a piece of SU! chipboard to make a base so the DVDs wouldn't flopa round. SU! chipboard is nice and thick. I painted it black with some Plaid paint from M's and dried it with my heat gun. Then attached the holder with Scor-tape to the bottom.

I decorated with the SU! top note die (another tool I absolutely love), the SU! curly label punch and a Dream stamp from my stash.
Hope you enjoyed this long winded post!! Thanks for stopping by.
Off to link to Craft It Wednesday http://craftitwednesday.blogspot.com/2009/08/week-6.html

Wednesday, August 19, 2009

Graduation Mini Album

Wow - I didn't mean to be away from here for so long. Life got in the way and I didn't create anything to share. I hope to be more consistent after next week. This weekend my eldest DD goes to college.

Just a quick update on the Sounds of Summer Album I posted earlier - I was one of the winners of the Bind It All Challenge - how fun is that!!! I won a Display It All to display my album! I can't wait to get my new sb room set up so I can put it on a shelf.

On to todays post. I made this mini graduation for a friend whose son is going off to college - Hi Judy if you're here!
Here is the front cover. Again I used my Bind It All to make the coils and hold it together.
the paper is various school papers I've collected and I don't really know the manufacturers.
I love to make these 6 x 6 albums. I call them "tube" albums cuz I fold a piece of 12 x 12 paper into a tube and crease with the overlap in the center. You end up with an opening on each end. For the covers, I close the opening but as you'll see below, I often make a pocket out of them.
I learned how to make these albums several years ago at Scrap-a-faire an online class by SB Etc. Unfortunately I didn't record the name of the teacher. If any of you know, drop me a line and I'll give her credit. I've searched and can't find it.
I made a 2 page layout for each year of high school. Each LO has its own pullout tag inside one of the pockets to record additional photos or memories.
also, I included a few nonspecific layouts.
This is my first album for a boy so I tried to keep it pretty clean and simple.
Thats all for today and probably the week. Happy Crafting y'all.
I'm off to link this to the craft it Wednesday blog. It was a great idea for me to join that blog because weeks like this one - it forced me to take a second and post.

Wednesday, August 5, 2009

Cards

I started this blog for a couple of reasons -some of which are to be more consistently creative and to broaden my crafting horizons. I thought it would help me to try some challenges. So today's post is my version of a sketch from My Time to Create from Lauren Meader at her blog http://laurenm.blogs.splitcoaststampers.com/ but I don't know how to post the example here. Sorry!!
I used SU! bashful blue cardstock, SU! Friends 24-7 , scraps from a K and Co pad, SU! bashful blue ribbon and my stash of navy ribbon, a random Dream stamp I had but don't know who made, versamark, SU! clear embossing powder, SU! punches - oval, curvey label

Here is a second version of the same card

On this one I put a strip of the patterned paper on top of the bashful blue ribbon and I used the designer label SU! punch as well.

Now my next challenge to myself is to actually MAIL some of the cards that I make!! Do you guys collect cards or send them?

Thanks for stopping by!

Andrea

Friday, July 31, 2009

Sounds of Summer Bind It ALL Album

I just uploaded an album that combines several of my scrapbooking favorites - the Bind It All and the Sounds Easy Voice Recorder.

Lately I seem to be mostly making mini albums - and there is no better way (IMHO) than with the BIA. I decided to participate in my first ever challenge on the BIA blog - a mini album on Summer.

So - I documented some of our favorite Sounds of Summer by recording the pictures AND the sounds with the Sounds Easy Voice Recorder. (See my first post for details on how easy the system works).

Here is the cover. I painted one of the BIA 5 x 7 chipboard covers with lime green and throughout the album used Die Cuts with a View Extreme Paper stack for patterned paper. The solid cardstock is Stampin Up! The sun is a scalloped SU! punch covered with flower soft (great stuff) with google eyes and a rhinestone smile. I'll probably add stickles to the title letters tomorrow. I like my BLING what can I say!

I wanted to use lots of different sizes and shapes in the album. The numbers on the bottom right of the page correspond to the sound captured on the Sounds Easy disk. The disk is stored in a pocket on the last page that you'll see later if you stick around that long.


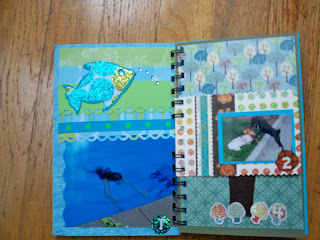
Here are the first 2 pages of the album.


On page 1. is a picture of my DD (when she was much younger) swimming in the pool. The sound corresponding is a Rascal Flatts song Summer Nights.


2. The neighborhood dogs having a "play date" while taking a walk. The sound recorded is them barking and playing.

3. These are some beautiful flowers I passed one day in the beginning of summer. I haven't picked which country song I'm going to record here yet. My DDs are helping me pick.

4. I had a great time with the Green Stack by DVWV on this page. I'm not sure how well the details show up here - but there is a tiny bird in the tree that I cut out of their paper and covered with stickles and crystal effects. The tree trunk is felt. The sound here is the birds that are singing and chirping in our yard.

For brevity I didn't post pages 5 and 6. They are of my container vegetable garden and the ferris wheel at a carnival.


7. One of my favorite places to be -the beach! I really like all the senses at the beach - the hot sun (well for a while anyway LOL), the feel of the sand on my toes while I'm sitting in a chair reading a book, the sounds of the waves crashing on the beach and the endless horizon over the ocean. I tried to capture the visual. The sound recorded is the waves crashing. For the other senses - we'll just have to use our imagination!


8. Sleepovers -what summer is complete with out a bunch of sleepovers!! I didn't post the LO due to the already long length of the post and I don't really like how that page came out LOL

9. 4th of July

Fireworks have become a tradition for us. My DH really enjoys his fireworks and so do we! This year we stopped at Phantom fireworks and got a wonderful selection for 7/4/09 We also set off fireworks at New Years. The sound will be of the fireworks themselves. We actually didn't make a recording of the sounds at 4th of July (cuz I wasn't thinking of it) so we are going to have to set some more off one night to capture the sound - which is just one more chance to have some fun .

10. What summer is complete without a trip to the ice cream place? Brewster gives dogs free ice cream so the layout is of our Max eating a cup of ice cream. I haven't figured out a sound for that one yet - ideas?

11. A road trip our eldest and I took to NC and Tennessee on the way (in a long about we're on vacation so we don't want to go the direct/fastest route possible way) to pick up our youngest from camp. The song is one we listened to a lot by Kelly Pickler


12. Bike rides. My husband and daughters have really enjoyed riding bikes during the summer evenings. Again, I will record a country song for the sounds - I'm just waiting for them to pick one and will update when they do

13. In June my Dad and Iwent to New York city with the girls. We had a fabulous time! Frequently Dad would sing NY NY and we'd all laugh because no one knew the next line of the song (till we used the Itouch and looked it up). So of course the sound on this page is ....Dad singing New York New York!

And finally - the back cover. I used a BIA acrylic 5 x7 tabed page
for the cover. Page 13 is on the flip side. I used double
sided paper on the road trip page that gave the blue
background and found the flower paper in my stash. I punched a hole in the acrylic with my Crop-a-dile so the ribbon could thread through to the other side. My DD has been cleaning out her room and I took a
denim skirt from the go-to-charity pile (I know I'm sorry
- some poor kid is without a skirt because I just thought
this pocket was too cute to resist)... If you open the pocket - you'll find the disk for the Sounds Easy with all the fun sounds of our summer.

If you've hung till the end - THANK YOU for stopping by!
Sorry for all the extra spacing - I'm having a learning curve here -the spacing doesn't show up as I type only when published. I'll fix it when I figure out how LOL

Stop by the Bind It all Blog http://binditall.blogspot.com/ to see more great albums!

Andrea

Thursday, July 30, 2009

Enjoy the Journey


The title of this blog is so true! Crafting and using my creativity keeps me grounded and sane. There is something about it that is soothing and relaxing. I decided to make myself a personal scrapbook - just for me - of things that I find meaningful at the time. No set theme -no set subject or pictures - just create a page that needs to be created.

This is one of the newest ones for this album. I went through my scraps and picked out some of my favorite papers and ribbons. I had a lot of fun with the weaving. I know there is an easier way - for example - tape all the vertical lines to the table and weave in and out the horizontal - but I didn't do it that way which made it more challenging LOL!

I had a lot of fun glimmer misting the flowers - the large one is Bazzil and the small blue one is Prima and the black glittery one is Making Memories. Glimmer Mist is my new FAV sb item!!

I also really like the the Anna Griffin lace corner don't you?

I signed up to participate in the Craft It Wednesday blog. I know this is a day late but I'm going to link you guys to there since I just found out about it today!

http://craftitwednesday.blogspot.com/

Thanks for vising!

Till next time....

Thats it for now!

Monday, July 27, 2009

I've taken the plunge!!!! Sounds Easy Page

I've been thinking and talking to friends about creating a blog - and HERE IT IS!! Why should I create a blog was a question I pondered for a long long time.

Answer: I've really enjoyed looking at blogs on the web for inspiration and pleasure. So I wanted to "give back" and join the fun.

Why not do it? Well - cuz in no particular order - In no way does my stuff compare to the blogs that inspire me. And because I craft in spurts and I might have long times without anything to add. And because I don't think anyone will visit.

Why do it? Well here is my answer to the above - Don't compare yourself. Because that only makes you lose. Enjoy the process and have fun - even if its a party of 1 (me)

So here we GO...............My first Creative Sanity sharing.

I was fortunate to create some samples for an amazing new company - Sounds Easy Voice Recorder - to take to winter CHA. I love this product. It allows you to record 30 separate audio - yes thats right AUDIO - recordings that are 30 seconds long. This has forever changed my scrapbooking. Not only can I document the visual (photo) memories I can now document the audio memories. The recorder uses interchangable memory devices. The chip (much like you have in a digital camera) is stored in a tiny envelope in your album. When you look through the album, you put the chip into the Sounds Easy Recorder (it records and plays back) and play the sound corresponding to your page. Easy and AWESOME!

Once this computer illiterate new blogger (AKA me) figures out how to post a picture I'm going to show you a layout I made for Sounds Easy of my DDs Bat Mitzvah (she will kill me for having her picture here so if you know her don't tell LOL).


She and I wove her Tallis (prayer shawl) and I made a color copy of it to use as my background paper. I recorded her chanting the Torah from the DVD taken during the event. The number 29 in the lower right hand corner is the corresponding number for the Sounds Easy.

If you've made it this far - or been here at all LOL - thanks!!

Andrea