Search This Blog

Saturday, September 5, 2009

My Favorite Card

To date this is my Favorite Card. I sent it to my dear friend and SU! demo who moved away - HI Sharon if you finally made it here!


I used the SU! set friends 24-7, bashful blue and chocolate chip cardstock, ink and ribbon. The top note die, a cuttlebug embossing folder and SU! clear embossing powder.
I embossed with clear embossing powder the brocades from the set to make my own patterned paper. I cut a top note from cardstock and then ran it through a cuttlebug embossing folder. I stamped the bird image twice in chocolate chip ink on scrap white c/s. I colored w/ SU! markers. The secondof the birds I cut out and adhered with popdots. I put glitter on his belly and layered the thinner brown ribbon ontop of the 1 inch thick blue ribbon. After attaching the ribbon I matted my glittered birdie and adhered to my top note. I then stamped brocades on the envelop flap - I love decorated envies! and the Friends sentiment on the lower left.


My new thing now is pretty insides . I needed to mail Sharon a check for my order so I folded the check in half and used the ribbon border like a pocket. The right side is pretty obvious - bashful blue c/s and a quick sentiment stamp.
Sorry if my descriptions are rambling and perhaps boring to some of y'all. I like when I go to blogs and the folks tell me what they used and/or how so I can take a little bit away for me to try. Do you guys like that or not?
Thats all for today! Thanks for stopping by.

Tuesday, September 1, 2009

Sponged Card


I decided to try something different today and tried to make a brayered card. Well that so did NOT work. I couldn't get rid of the lines the brayer left. If any of you guys have any brayer tips - HELP!! I suppose in the next few days I'll be stalking YouTube for tips.
So I tried the next best thing. I used SU! sponges and sponged white cardstock with all SU! colors - yoyo yellow, only orange, real red, close to cocoa, and chocolate chip. The trees and birds are from Definately Decorative Pines - a retired SU! set and I inked it with sage green and then took all the different green markers and thumped and generally just dabbed ontop of the inked stamp to give shading of the trees. The ground is a beach/sand stamp from my stash. I used the nesties to cut my label and the sentiment is from SU! Simple Delights.
I like how this looks IRL. Next I want to try a beachy type scene. I'm gonna have to think about the shades of blue to use...ok thats all for now - dinner calls!! Thanks for stopping by!!
P.S. So ok - I really need to find a better way to take photos cuz this looks so much prettier and richer in real life...I'll add it to the list of what I wanna learn - but I may retake this tomorrow when the sun is out - I bet that will help

Sunday, August 30, 2009

DVD Project

DVD Holder

This is about my journey to create a DVD holder for my DD to take movies to college. She has a huge movie collection and the DVD cases took up too much space. She asked me to make something right before moving day. Now I've never created from "scratch" any kind of box or bag etc. I've done lots by following tutorials. Here is the first creation I made - simple and not too decorated as time was short and DD has simple and clean taste.
I of course used my Bind It All to hold it all together. This has to be one of the best tools I've ever purchased. As you cann see here on my blog - I sure do use it alot!
I started off with the paper cd holders. They were not big enough to hold a DVD and be bound with the BIA so I folded the little flap back and decided my holder would have to make sure to have a closed side so nothing fell out.


I used SU! real red and black cardstock. The patterned paper is from my stash (yeah!! I used some!!)

Looks great right?? Well there was a problem. I told you this was my first "design" of anything like this and I forgot to account for the extra space the DVDs would take in the envelops so the project looked nice in the photo above here while empty but it was so big when full that not only did it not close but the BIA rings weren't big enough to hold it. BIA has come out with a bigger coil but I don't have any nor do I have access to a LSS any more :{ and Hobby Lobby doesn't carry the big coils yet.
So time to be CREATIVE!
Here you can kind of see what I'm talking about - see how "fat it is"? Well I split it in two and decided to use 1 coil in the center to hold two mini holders on each side.
I then used the same cover I had already made for the holder before I realized how much room the DVDs take. I made another one just like it and attached it to the other side. I used velcro to hold the flaps closed.

The finished product! I took a piece of SU! chipboard to make a base so the DVDs wouldn't flopa round. SU! chipboard is nice and thick. I painted it black with some Plaid paint from M's and dried it with my heat gun. Then attached the holder with Scor-tape to the bottom.

I decorated with the SU! top note die (another tool I absolutely love), the SU! curly label punch and a Dream stamp from my stash.
Hope you enjoyed this long winded post!! Thanks for stopping by.
Off to link to Craft It Wednesday http://craftitwednesday.blogspot.com/2009/08/week-6.html

Wednesday, August 19, 2009

Graduation Mini Album

Wow - I didn't mean to be away from here for so long. Life got in the way and I didn't create anything to share. I hope to be more consistent after next week. This weekend my eldest DD goes to college.

Just a quick update on the Sounds of Summer Album I posted earlier - I was one of the winners of the Bind It All Challenge - how fun is that!!! I won a Display It All to display my album! I can't wait to get my new sb room set up so I can put it on a shelf.

On to todays post. I made this mini graduation for a friend whose son is going off to college - Hi Judy if you're here!
Here is the front cover. Again I used my Bind It All to make the coils and hold it together.
the paper is various school papers I've collected and I don't really know the manufacturers.
I love to make these 6 x 6 albums. I call them "tube" albums cuz I fold a piece of 12 x 12 paper into a tube and crease with the overlap in the center. You end up with an opening on each end. For the covers, I close the opening but as you'll see below, I often make a pocket out of them.
I learned how to make these albums several years ago at Scrap-a-faire an online class by SB Etc. Unfortunately I didn't record the name of the teacher. If any of you know, drop me a line and I'll give her credit. I've searched and can't find it.
I made a 2 page layout for each year of high school. Each LO has its own pullout tag inside one of the pockets to record additional photos or memories.
also, I included a few nonspecific layouts.
This is my first album for a boy so I tried to keep it pretty clean and simple.
Thats all for today and probably the week. Happy Crafting y'all.
I'm off to link this to the craft it Wednesday blog. It was a great idea for me to join that blog because weeks like this one - it forced me to take a second and post.

Wednesday, August 5, 2009

Cards

I started this blog for a couple of reasons -some of which are to be more consistently creative and to broaden my crafting horizons. I thought it would help me to try some challenges. So today's post is my version of a sketch from My Time to Create from Lauren Meader at her blog http://laurenm.blogs.splitcoaststampers.com/ but I don't know how to post the example here. Sorry!!
I used SU! bashful blue cardstock, SU! Friends 24-7 , scraps from a K and Co pad, SU! bashful blue ribbon and my stash of navy ribbon, a random Dream stamp I had but don't know who made, versamark, SU! clear embossing powder, SU! punches - oval, curvey label

Here is a second version of the same card

On this one I put a strip of the patterned paper on top of the bashful blue ribbon and I used the designer label SU! punch as well.

Now my next challenge to myself is to actually MAIL some of the cards that I make!! Do you guys collect cards or send them?

Thanks for stopping by!

Andrea

Friday, July 31, 2009

Sounds of Summer Bind It ALL Album

I just uploaded an album that combines several of my scrapbooking favorites - the Bind It All and the Sounds Easy Voice Recorder.

Lately I seem to be mostly making mini albums - and there is no better way (IMHO) than with the BIA. I decided to participate in my first ever challenge on the BIA blog - a mini album on Summer.

So - I documented some of our favorite Sounds of Summer by recording the pictures AND the sounds with the Sounds Easy Voice Recorder. (See my first post for details on how easy the system works).

Here is the cover. I painted one of the BIA 5 x 7 chipboard covers with lime green and throughout the album used Die Cuts with a View Extreme Paper stack for patterned paper. The solid cardstock is Stampin Up! The sun is a scalloped SU! punch covered with flower soft (great stuff) with google eyes and a rhinestone smile. I'll probably add stickles to the title letters tomorrow. I like my BLING what can I say!

I wanted to use lots of different sizes and shapes in the album. The numbers on the bottom right of the page correspond to the sound captured on the Sounds Easy disk. The disk is stored in a pocket on the last page that you'll see later if you stick around that long.
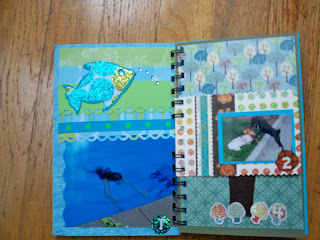


Here are the first 2 pages of the album.


On page 1. is a picture of my DD (when she was much younger) swimming in the pool. The sound corresponding is a Rascal Flatts song Summer Nights.


2. The neighborhood dogs having a "play date" while taking a walk. The sound recorded is them barking and playing.

3. These are some beautiful flowers I passed one day in the beginning of summer. I haven't picked which country song I'm going to record here yet. My DDs are helping me pick.

4. I had a great time with the Green Stack by DVWV on this page. I'm not sure how well the details show up here - but there is a tiny bird in the tree that I cut out of their paper and covered with stickles and crystal effects. The tree trunk is felt. The sound here is the birds that are singing and chirping in our yard.

For brevity I didn't post pages 5 and 6. They are of my container vegetable garden and the ferris wheel at a carnival.


7. One of my favorite places to be -the beach! I really like all the senses at the beach - the hot sun (well for a while anyway LOL), the feel of the sand on my toes while I'm sitting in a chair reading a book, the sounds of the waves crashing on the beach and the endless horizon over the ocean. I tried to capture the visual. The sound recorded is the waves crashing. For the other senses - we'll just have to use our imagination!


8. Sleepovers -what summer is complete with out a bunch of sleepovers!! I didn't post the LO due to the already long length of the post and I don't really like how that page came out LOL

9. 4th of July

Fireworks have become a tradition for us. My DH really enjoys his fireworks and so do we! This year we stopped at Phantom fireworks and got a wonderful selection for 7/4/09 We also set off fireworks at New Years. The sound will be of the fireworks themselves. We actually didn't make a recording of the sounds at 4th of July (cuz I wasn't thinking of it) so we are going to have to set some more off one night to capture the sound - which is just one more chance to have some fun .

10. What summer is complete without a trip to the ice cream place? Brewster gives dogs free ice cream so the layout is of our Max eating a cup of ice cream. I haven't figured out a sound for that one yet - ideas?

11. A road trip our eldest and I took to NC and Tennessee on the way (in a long about we're on vacation so we don't want to go the direct/fastest route possible way) to pick up our youngest from camp. The song is one we listened to a lot by Kelly Pickler


12. Bike rides. My husband and daughters have really enjoyed riding bikes during the summer evenings. Again, I will record a country song for the sounds - I'm just waiting for them to pick one and will update when they do

13. In June my Dad and Iwent to New York city with the girls. We had a fabulous time! Frequently Dad would sing NY NY and we'd all laugh because no one knew the next line of the song (till we used the Itouch and looked it up). So of course the sound on this page is ....Dad singing New York New York!

And finally - the back cover. I used a BIA acrylic 5 x7 tabed page
for the cover. Page 13 is on the flip side. I used double
sided paper on the road trip page that gave the blue
background and found the flower paper in my stash. I punched a hole in the acrylic with my Crop-a-dile so the ribbon could thread through to the other side. My DD has been cleaning out her room and I took a
denim skirt from the go-to-charity pile (I know I'm sorry
- some poor kid is without a skirt because I just thought
this pocket was too cute to resist)... If you open the pocket - you'll find the disk for the Sounds Easy with all the fun sounds of our summer.

If you've hung till the end - THANK YOU for stopping by!
Sorry for all the extra spacing - I'm having a learning curve here -the spacing doesn't show up as I type only when published. I'll fix it when I figure out how LOL

Stop by the Bind It all Blog http://binditall.blogspot.com/ to see more great albums!

Andrea

Thursday, July 30, 2009

Enjoy the Journey


The title of this blog is so true! Crafting and using my creativity keeps me grounded and sane. There is something about it that is soothing and relaxing. I decided to make myself a personal scrapbook - just for me - of things that I find meaningful at the time. No set theme -no set subject or pictures - just create a page that needs to be created.

This is one of the newest ones for this album. I went through my scraps and picked out some of my favorite papers and ribbons. I had a lot of fun with the weaving. I know there is an easier way - for example - tape all the vertical lines to the table and weave in and out the horizontal - but I didn't do it that way which made it more challenging LOL!

I had a lot of fun glimmer misting the flowers - the large one is Bazzil and the small blue one is Prima and the black glittery one is Making Memories. Glimmer Mist is my new FAV sb item!!

I also really like the the Anna Griffin lace corner don't you?

I signed up to participate in the Craft It Wednesday blog. I know this is a day late but I'm going to link you guys to there since I just found out about it today!

http://craftitwednesday.blogspot.com/

Thanks for vising!

Till next time....

Thats it for now!